Table of Contents
- Part 1. Tire Specifications: Decoding Your Sidewall
- 1. Basic Size & Dimensions (Example: P185/75R14)
- 2. Load Index & Speed Rating (Example: 82S)
- 3. Tire Category Indicators
- 4. The UTQG Uniform Tire Quality Grading (The "Three Rules")
- 5. DOT Date Code
- 6. Maximum Pressure vs. Recommended Pressure
- Part 2. Wheel Specifications: Decoding 6J×14 ET45 5×100 CB56.1
- Part 3. Comprehensive Planning Before Modding
Understanding the numbers and letters stamped on your tires and wheels is a fundamental skill for every car owner. Using a common tire specification (P185/75R14) and wheel specification (6J×14 ET45 5×100 CB56.1), this comprehensive guide breaks down the exact meaning of each parameter and shares critical pitfalls to avoid when upgrading or modding your setup.
Part 1. Tire Specifications: Decoding Your Sidewall
Every piece of critical information about a tire is molded right into its sidewall. Let’s break it down section by section.
1. Basic Size & Dimensions (Example: P185/75R14)
| Field | Meaning | Explanation |
| P | Vehicle Type | Short for Passenger car. Other prefixes include LT (Light Truck, used for pickups/heavy-duty SUVs), or no prefix at all (Euro-metric general-purpose tires). |
| 185 | Section Width (mm) | The linear distance between the outer sidewalls of an inflated tire. A wider tire generally provides better grip but increases fuel consumption. Note: The actual contact patch width is slightly smaller than this nominal value. |
| 75 | Aspect Ratio (%) | The profile height of the sidewall expressed as a percentage of the section width. In this case, 185mm × 75% = 138.75mm (the height of the sidewall). |
| R | Internal Construction | Short for Radial. The internal fabric cords run perpendicular to the direction of travel. You might also see ZR, which indicates a high-speed radial tire commonly found on performance vehicles. |
| 14 | Rim Diameter (inches) | Indicates that this tire must be mounted on a 14-inch wheel. (1 inch = 25.4mm). |
With these numbers, you can determine a tire’s width, sidewall thickness, overall rolling diameter, and the wheel size it requires. When buying replacements, quoting this exact string of numbers is usually all your tire shop needs.
2. Load Index & Speed Rating (Example: 82S)
-
82 – Load Index: Represents the maximum weight capacity the tire can safely support. Looking up “82” on the standard index chart reveals a maximum load capacity of 475 kg (approx. 1,047 lbs) under proper inflation.
-
S – Speed Rating: Indicates the maximum safe speed the tire can sustain. An “S” rating is certified for up to 180 km/h (112 mph). Common ratings span from J to Y, with higher ratings commanding higher prices. Your replacement tires should never have lower load or speed ratings than your vehicle’s factory standards.
3. Tire Category Indicators
-
M+S (Mud + Snow): Indicates all-season or winter capabilities with specialized tread compounds designed to perform better in lower temperatures.
-
All-Season: Designed for year-round use; this is the most common type for everyday commuter vehicles.
-
AT (All-Terrain) / MT (Mud-Terrain): Designed for off-road and utility vehicles.
-
R-Compound / Semi-Slick: Performance tires with minimal tread patterns optimized for extreme dry grip. Warning: They offer almost zero traction in rain, snow, or cold weather and are highly impractical for daily driving.
4. The UTQG Uniform Tire Quality Grading (The “Three Rules”)
These three performance metrics are stamped directly on the tire sidewall:
-
Treadwear: A unitless number indicating a tire’s relative wear rate. For example, a tire graded 200 should theoretically last twice as long as one graded 100. Typical all-season passenger tires range from 500 to 600. Note: This number does not translate directly into miles, and testing standards vary slightly between manufacturers.
-
Traction: Measures the tire’s ability to stop on wet concrete and asphalt in a straight line. Grades are AA, A, B, and C (with AA being the highest). It does not evaluate cornering or acceleration grip. The vast majority of standard passenger tires are graded A.
-
Temperature: Graded A, B, or C, this measures the tire’s resistance to heat generation and its ability to dissipate heat under high-speed operation.
-
Grade A: Safely dissipates heat at speeds over 184 km/h (114 mph).
-
Grade B: Rated for speeds between 160–184 km/h (100–114 mph).
-
Grade C: Rated for speeds between 136–160 km/h (85–100 mph). Running past these thresholds increases the risk of a heat-induced blowout.
-
5. DOT Date Code
Look for a 4-digit number enclosed within a small stamped oval on the sidewall, such as 0720.
-
First Two Digits: The week of production (07 = 7th week of the year).
-
Last Two Digits: The year of production (20 = 2020).
-
Example: 0720 means the tire was manufactured in the 7th week of 2020. Always check this code when purchasing new tires to ensure you aren’t buying old stock; rubber naturally degrades over time regardless of tread depth.
6. Maximum Pressure vs. Recommended Pressure
Your tire sidewall lists a maximum cold inflation pressure, such as 760 kPa (110 psi). This is a safety ceiling, NOT your daily driving pressure. Think of it this way: just because a person can survive drinking 3 bottles of liquor doesn’t mean they should do it every day. For routine driving, always refer to the Recommended Tire Pressure listed in your owner’s manual or on the placard inside the driver’s door jamb or fuel door. For most passenger cars, this is around 240 kPa (2.4 bar / 35 psi). Never inflate your tires to the maximum value stamped on the sidewall.
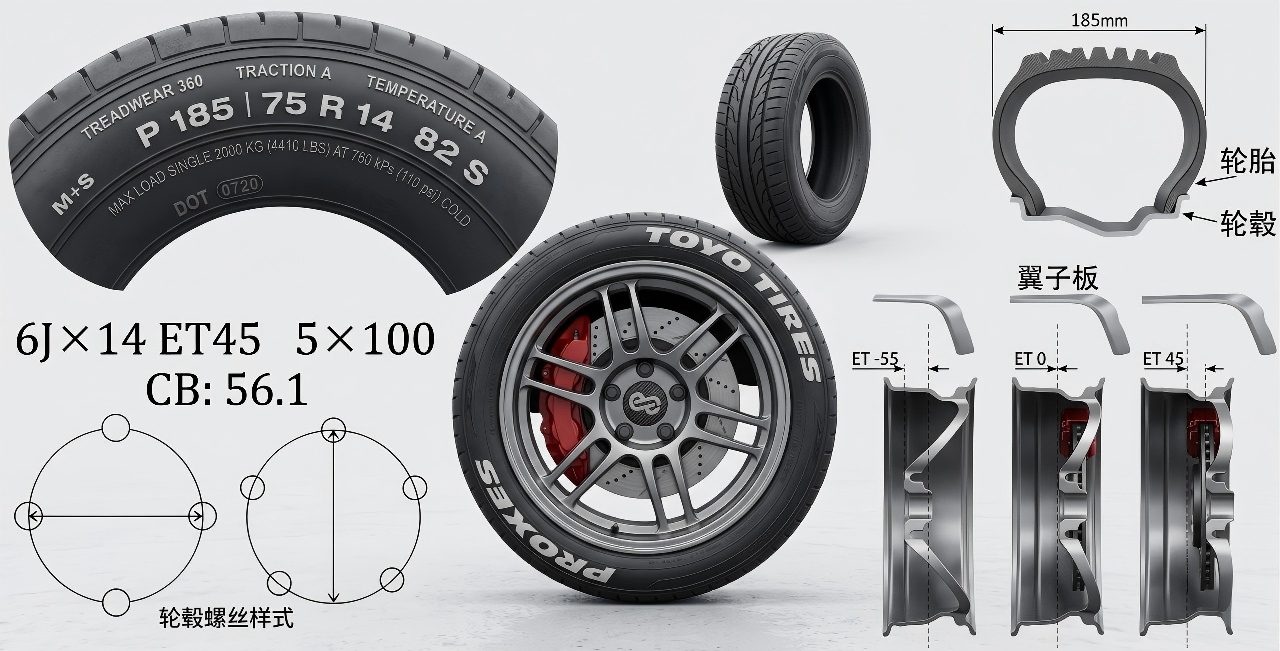
Part 2. Wheel Specifications: Decoding 6J×14 ET45 5×100 CB56.1
While tires are flexible, wheel specs are rigid. These dimensions dictate whether a wheel will physically fit onto your car without mechanical failure.
| Field | Meaning | In-Depth Breakdown |
| 6J | Width & Flange Type | 6 inches (152.4mm). This measures the distance between the inner tire-seating lips, not the absolute total width of the wheel. The letter J refers to the shape of the wheel flange profile, which is standard for most passenger cars. Because the lips themselves add roughly half an inch per side, the true total width of this wheel is closer to 7 inches (177.8mm). |
| ×14 | Diameter | 14 inches. This must perfectly match your tire’s 14-inch inner diameter specification. |
| ET45 | Offset (mm) | Short for the German word Einpresstiefe. This is the distance from the wheel’s mounting pad to its true centerline. A positive offset (e.g., +45mm) tucks the wheel inward toward the suspension. A negative offset (e.g., -55mm) pushes the wheel outward away from the car. Factory commuter cars usually feature positive offsets (+35mm to +55mm). If you want your wheels to sit flush with your fenders, you can select a lower ET value without altering the wheel’s width. |
| 5×100 | Bolt Pattern (PCD) | 5 represents the number of lug nut holes. 100 means those holes sit on a pitch circle diameter (PCD) of 100mm. Both the hole count and the diameter must match your car’s hub exactly, or the wheel cannot be mounted. Different automakers use different PCD standards (e.g., 100, 112, 114.3, 120, etc.). |
| CB56.1 | Center Bore (mm) | The diameter of the machined center hole on the back of the wheel. Ideally, this should match your vehicle’s factory hub diameter perfectly (hub-centric). You can buy aftermarket wheels with a larger center bore and use hub-centric adapter rings (hub rings) to fill the gap. However, you can never install a wheel with a center bore smaller than your vehicle’s hub, as it won’t seat properly and will cause severe high-speed vibrations. |
Part 3. Comprehensive Planning Before Modding
Modifying your wheels and tires is a highly connected mechanical ecosystem—it is never just about finding a design you like. Any single modification will trigger a chain reaction. Before clicking “buy,” answer these critical questions:
-
Do you plan to upgrade to a Big Brake Kit (BBK) in the future?
-
Reaction: You must verify that the wheel’s internal spoke design and barrel clearance offer enough room to clear the larger calipers.
-
-
Are you planning to lower your ride height (via coilovers or lowering springs)?
-
Reaction: Running an aggressive offset (a low ET value that pushes the wheel outward) may cause the tire to slam into or rub against the inner fender liner when cornering or hitting bumps.
-
-
Do you intend to increase your engine’s horsepower?
-
Reaction: Putting down more power requires a wider tire contact patch (e.g., stepping up from a 225mm tire to a 275mm tire). However, a wider tire requires a wider wheel width (J value); you cannot squeeze a 275mm tire onto a narrow 8-inch rim—you would need at least a 9.5-inch rim.
-
The Three Spatial Rules of Wheel Fitment:
Your new setup must comfortably clear three dimensional thresholds across its full range of motion:
-
Vertical Plane: The wheel and tire must move up and down freely with the suspension without hitting or cutting into the fenders.
-
Horizontal Plane: The front wheels must turn fully from lock to lock without rubbing against the plastic inner fender liners.
-
Depth Plane: The back of the wheel and tire must never make contact with your brake calipers, suspension struts, control arms, or tie rods.
Summary: Modifying your stance is an interdependent system—change one factor, and you affect them all. Map out your complete build goals first, match them precisely to the technical specs above, and you will save thousands of dollars while keeping your vehicle both safe and performant.